Printer Friendly
Title
Activity: Build a Drifter
NGSS Science and Engineering Practices
NGSS Crosscutting Concepts
NGSS Disciplinary Core Ideas
Materials
- Transect measuring tape
- Buoyant objects (e.g., empty bottles, corks)
- Neutrally buoyant objects (e.g., partially filled bottles, sponges) or underwater sail material (e.g., cloth, plastic bags)
- Negatively buoyant objects (e.g., fishing weights or metal washers)
- String or fishing line
- Stopwatch
- Transect tape
- Bucket of water
- Net on a pole
- (Optional) Method for measuring wind speed and direction (e.g., compass, Beaufort scale, wind meter)
Procedure
Safety Note: Be mindful of the risks of drowning when working near bodies of water. Follow all posted safety signs and check local ocean and weather conditions.
A. Construct a drifter.
- Your instructor will give you preliminary information about your field site, including
- Location
- Type of water body (e.g., stream, beach, or lake)
- Expected water depth
- Map of sampling area
- Any potential hazards
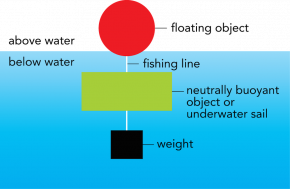
Fig. 3.19. A floating object keeps the drifter from sinking. A neutrally buoyant object or underwater sail allows the drifter to be pulled by the current. A weight makes sure the neutrally buoyant object or sail does not float to the surface.
- Based on your knowledge of the field site and the materials available to you, design a drifter. Fig. 3.19 provides an example of a basic drifter construction, however, there are several ways to construct drifters. These are some important considerations to include in your design:
- The size of your drifter (Your instructor may limit the size of your drifter.)
- The depth in the water that you would like to measure current speed
- How you will measure current speed (e.g., using a stopwatch and transect tape)
- A plan to recover your drifter
- Construct your drifter as shown in Fig. 3.19
- Test your drifter in a bucket of water to make sure it does not fully sink or float. Remember to test your drifter in salt water if it will be used in the ocean, or fresh water if it will be used in a lake or river, because salinity affects buoyancy.
- Make sure your drifter is sturdy enough that is does not fall apart when in the water.
- Revise your drifter design as needed.
B. Experimental design.
- Given your prior knowledge about the field site, design an experiment to measure current speed. Consider the following:
- Drifter placement
- The distance over which your drifter will travel
- How to effectively deploy and recover the drifter
- How to measure drifter speed
- How many measurements to take
- Discuss your experimental design with your class. Revise your experimental design as necessary.
C. Deploy the drifter in the field.
- After arriving at the field site, revisit your experimental design. Make any changes needed. Measure the prevailing wind direction and, if possible, its speed.
- Predict the current speed at your field site.
- Deploy your drifter following your experimental design and record the current speed.
- Recover your drifter.
- (Optional) Deploy your drifter at a similar or different site depending on your experimental design and time constraints.
D. Discuss drifter performance.
- If your classmates placed their drifter in similar areas, compare
- Current speed
- Current direction
- Drifter path
- Sinking and/or floating of the drifters
- Deployment and recovery of drifters
- (Optional) Revise your drifter design and repeat Part C.
Activity Questions
- Why is it important to have a portion of your drifter underwater?
- Explain the reasoning for your experimental design. Did you revise your drifter design over the course of this activity? Explain your decisions for your modifications and how they affected your drifter’s performance.
- Explain your method for recovering or recapturing your drifter. Why is this step important?
- Was your predicted current flow measurement similar to your measured value? If your predicted flow rate was an over- or under-estimate, explain why you think your predictions were inaccurate.
- If you repeated your drifter measurements, were your measured current speeds similar? Explain why you think they were similar or give reasons for why you think they were different.
- Based on you and your classmates’ drifter observations, do you think the water flow rate was constant in your study area? Explain why or why not.
- Did the drifter follow a straight path when you observed it? How would a current path that was not straight have affected your results?
- If your classmates placed their drifters in similar areas, explain similarities and differences for the following:
- Current speed
- Current direction
- Drifter path
What other factors may have affected the results of your experiment?
- If you had a chance to repeat the experiment,
- Would you modify your drifter?
- Would you modify your experimental design?
- How did the speed and direction of the water current compare to the wind speed and direction? Explain how they were similar or different.
- The goal of this activity was to measure currents at depth.
- How do you think these currents were similar or different than the surface currents at your study area?
- Why do you think scientists would want to study both currents at the surface and under the water?
Exploring Our Fluid Earth, a product of the Curriculum Research & Development Group (CRDG), College of Education. © University of HawaiФi, 2011. This document may be freely reproduced and distributed for non-profit educational purposes.


