Title

ACTIVITY: Sprout Your Own Sprouts

NGSS Science and Engineering Practices
NGSS Crosscutting Concepts
The activity below draws from the content in the page Materials for Plant Growth


Image
Image caption

Fig. 1. Sprouts are a nutritious and easy to grow snack! 

Image copyright and source

Image courtesy of Wikimedia Commons

Phenomenon:

Seeds can sprout without soil (Fig. 1)!

Inquiry:

How do plants survive and thrive without soil?

Guiding Questions:

  1. What do people/animals need to grow bigger?

  2. How are plants different than animals?

  3. What are the main things that plants need to grow?

Activity:

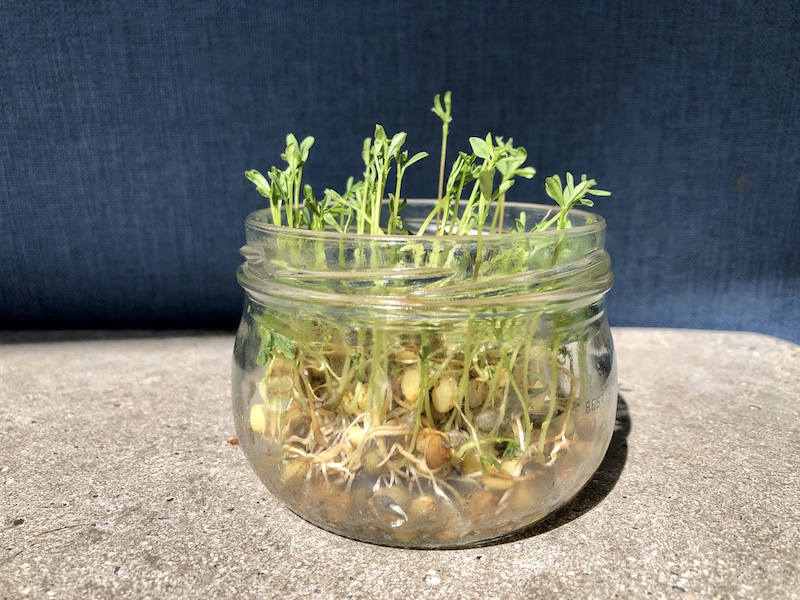
Watch as your sprout seedlings flourish into a nutrious snack in a matter of days (Fig. 2)!


Image
Image caption

Fig. 1. Watch as the sprouts grow in a matter of days.

Image copyright and source

Image by Emily Sesno


Materials:


  • Student worksheet and teacher guide (attached below):
    This teacher guide follows the procedure written here and in the student worksheet with additional instructions and guidelines. We highly recommend starting this activity by introducing the Phenomenon, Inquiry, and Guiding Questions from the top of this webpage
  • Sprout seeds (about one tablespoon per person). Lentils work well. A variety of sprouting seeds can also be ordered through vendors such as Sprout People.
  • Glass jar or clear plastic container (about 8 ounces for each tablespoon of sprout seed) 
  • Mesh or sprouting screen (shade cloth, reusable produce bags, cheese cloth)
  • Rubber band
  • Access to running water and a sink
  • Drying rack or container to catch water (so you can place your jar with the cloth upside down to drain)
  • Counter or table space with sunlight for growing your sprouts

Teacher Recommendations

  • The size of the jar needed depends on how many students you have in each group and how many sprouts you want to grow. We tested 1/2 cup - 1 liter size jars.
  • A little bit goes a long way with sprouts!
    • Figure 2 shows 1/4 cup of alfalfa seeds—resulting in over 2 cups of sprouts!
    • For smaller batches, we used 2 tbs of lentils in 8 ounze jars.
  • It is important that the seeds are thouroughly rinsed twice a day to prevent them from going bad. Shake the sprouts vigorously during the rinsing process! The optimal moisture will depend on the type of sees:
    • Larger seeds, like lentils and garbanzo beans, dry easily and can be rinsed by hand or with a colander, but you may need to add some water to the container after rinsing.
    • However, small seeds, like fennel and alfalfa, may need more effort to dry effectively. You can dry small seeds using centrifugal force; place the jar upside down in a reusable produce bag, small tote bag, or even a sock and spin it in circles. This will force water out of the jar. Be careful not to let go! 
  • Seeds and sprouts don't need sunlight until they start developing leaves and begin to photosynthesize. 

Notes on Materials:

  • Image
    Image caption

    Fig. 3. These lentils have been sprouted upright and are continuing to grow towards the sunlight.

    Image copyright and source

    Image by Emily Sesno

    Sprouts can also be grown upright in a jar without a mesh top, which will result in more grass-like, uniform growth of the sprouts. However, the sprouts have a tendency to get rotten in this position if they do not dry fully (Fig. 3).

  • Seed choice:

Seeds will begin sprouting within a day and will continue to sprout for a week or more. They can be eaten throughout their growth phases for a nutrient packed snack. Some details may vary depending on the seed. For instructions specific to other seeds, check out Sprout People.

  • Image
    Image caption

    Fig. 4. Sprouts grow to different sizes, as seen here with a soybean sprout and mung bean sprout side by side.

    Image copyright and source

    Image courtesy of Wikimedia Commons

    Pulses (legumes; pea family):
    alfalfa, clover, fenugreek, lentil, pea, chickpea, mung bean and soybean (bean sprouts).

  • Cereals:
    oat, wheat, maize (corn), rice, barley, and rye
  • Pseudocereals:
    quinoa, amaranth, and buckwheat
  • Oilseeds:
    sesame, sunflower, almond, hazelnut, hemp, linseed, and peanut.
  • Brassica (cabbage family):
    broccoli, cabbage, watercress, mustard, mizuna, radish, and daikon (kaiware sprouts), rocket (arugula), tatsoi, turnip).

Procedure:

  1. Follow along on your worksheet to conduct your experiment and answer the questions.
  2. Read the background information on your sheet to learn about seeds:

Background

Image
Image caption

Fig. 5. A deeper dive into a seed reveals hidden parts of the embryo and the stored nutrients that allows it to grow.

Image copyright and source

Adapted image courtesy of Wikimedia Commons

A seed is a ready-packed suitcase of nutrition (Fig. 5). Inside is a dormant embryo that can eventually grow into a plant. The hull is a protective coating to keep the embryo safe. In order to start germination, we add water to activate the seed. The water opens up the hull and allows the embryo to use the nutrients inside the seed to fuel the plant's growth. In addition to water, the seed needs oxygen to start growing. 

As the seed sprouts and starts to grow into a plant, roots will develop to collect nutrients and water. Eventually, leaves will grow to absorb sunlight and carbon dioxide (CO2) from the air, which the plant will use to photosynthesize. (Note: plants also absorb oxygen from the air for respiration. This is especially evident at night when there is no sunlight for photosynthesis.


Sprout Activity Vocabulary

  • Embryo: the part of a seed which develops into a plant. It consists of a plumule and hypocotyl (primary stem), a radicle (primary root), and one or two cotyledons (primary leaves).
  • Germination: the process by which an organism grows from a seed or similar structure.
  • Hull: the outer covering of a fruit or seed, especially the pod of peas and beans, or the husk of grain.
  • Photosynthesis: the process by which plants use energy from sunlight to grow. Photosynthesis uses carbon dioxide and water and releases oxygen.
  • Respiration: the process of breaking down food to usable energy inside a cell. Aerobic respiration uses oxygen and releases carbon dioxide and water.

Activate your seeds

  1. Measure out the desired amount of seeds into the jar. If you are using more than one type of seed, label your jars.
    Note: Fig. 2 shows 1/4 cup of alfalfa seeds to start, resulting in over 2 cups of sprouts - a little bit goes a long way!
  2. Add enough water so all seeds are covered. 
  3. Cover the jar with the mesh, securing with a rubber band. 
  4. Soak your seeds overnight.
  5. After soaking, rinse and drain your seeds thoroughly.
    Note: make sure your seeds are really dry - they can go bad quickly if they are left sitting in a lot of moisture.
  6. Secure the mesh in place, and leave the jar titled upside down so water can continue to drain freely.
    Note: sprouts need oxygen, so be sure to find a place (such as a drying rack) that can allow air flow while seeds are growing.

Daily care of your seeds

  1. Your seeds need to be rinsed and drained at least once per day (more if you can!).
    1. Image
      Image caption

      Fig. 6. A simple sprouting system with a mesh screen for drainage.

      Image copyright and source

      Image by Kanesa Duncan Seraphin

      Turn the jar upright, and fill with enough water to cover the seeds. Gently shake the seeds in the jar.

    2. Drain again thoroughly
  2. Draw a picture of one of your sprouts (choose one that represents average growth).
  3. Resecure the mesh, and leave the jar tilted upside down so water can continue to drain freely (Fig. 6).
  4. Repeat steps 9-11 one or two times a day for the next few days. 
  5. Sprouts are packed with nutrition and can be eaten as they grow! Try eating a sprout each day to see how the flavor changes!

Activity Questions

  1. Describe what your seeds looked like as they began to sprout.

  2. What did you do each day to help your seeds sprout and grow?

  3. What happened to your sprouts as time went on? 

  4. Did you notice your sprouts growing in a particular direction? Describe.

  5. Draw a picture of one of your finished sprouts. Label the leaves, stem, and roots. If your sprout still has some of the seed, label that also.

  6. Why do you think your sprouts were able to grow without dirt?

  7. Based on your investigation of sprouts, what are the key ingredients that a seed needs to grow?

Further Investigations

  1. Manipulate variables: Choose a variable that affects your sprouts growth that you would like to manipulate. Make a plan to explore that in an experiment (hint: check out the suggested activity below for ideas).
  2. Grow a mature plant without soil in the activity below:
    1. Compare your results and discuss how plants get the materials they need to grow cheifly from air and water.


Related Conversations

Exploring Our Fluid Earth, a product of the Curriculum Research & Development Group (CRDG), College of Education. University of Hawai?i, 2011. This document may be freely reproduced and distributed for non-profit educational purposes.