This teacher guide follows the procedure written here and in the student worksheet with additional instructions and guidelines. We highly recommend starting this activity by introducing the Phenomenon, Inquiry, and Guiding Questions from the top of this webpage.
Part A: Learn Morse Code
Flashlight
Optional: Piece of dark construction paper
Morse Code Guide (Use Figs. 2 and 3 or print the activity sheet):
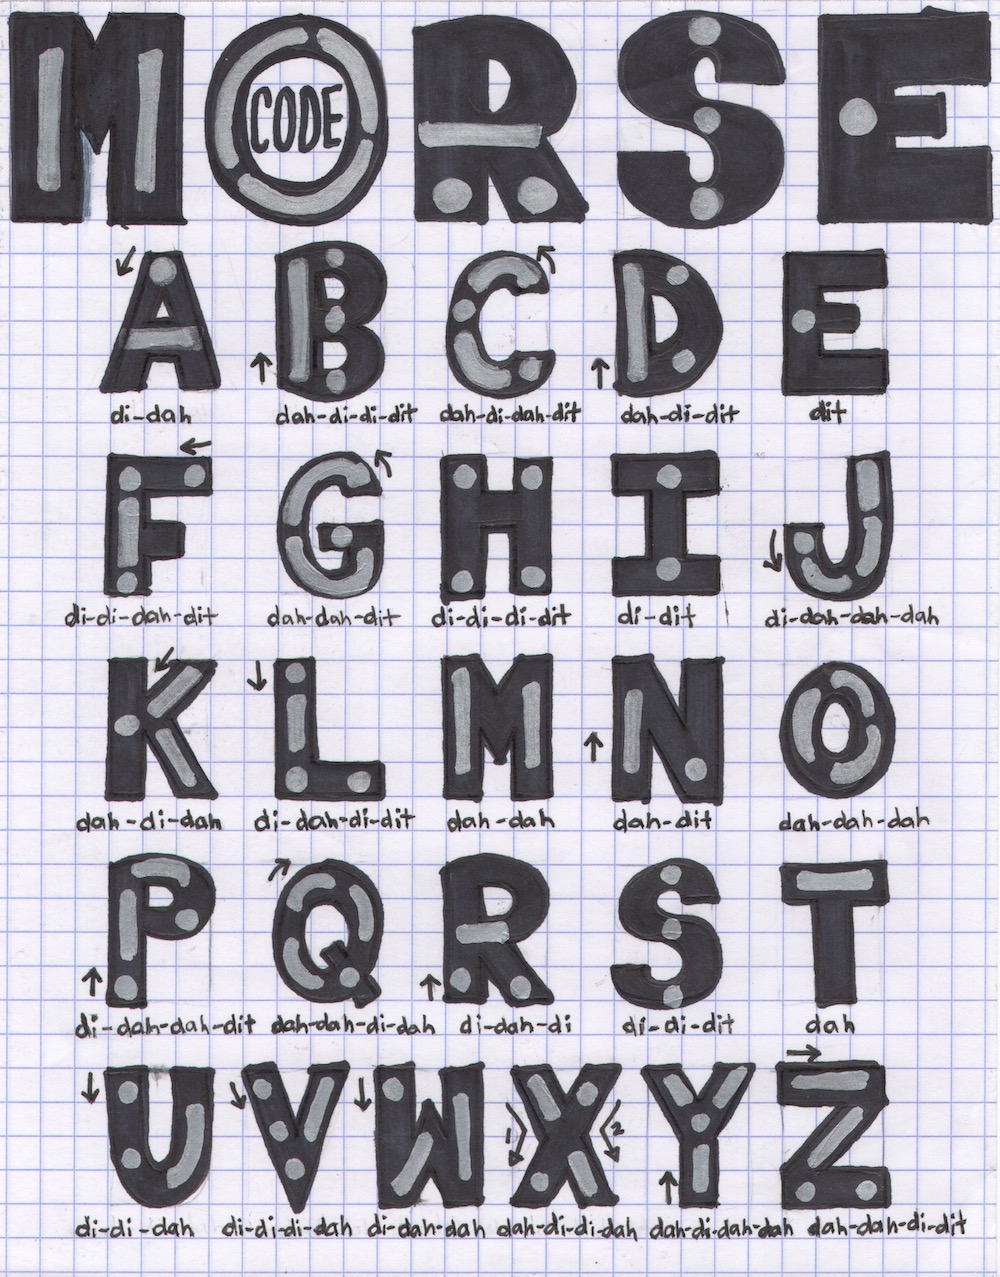
Fig. 2. This Morse Code Guide shows how each letter is formed.
Image copyright and source
Image by Emily Sesno
Image
Image caption
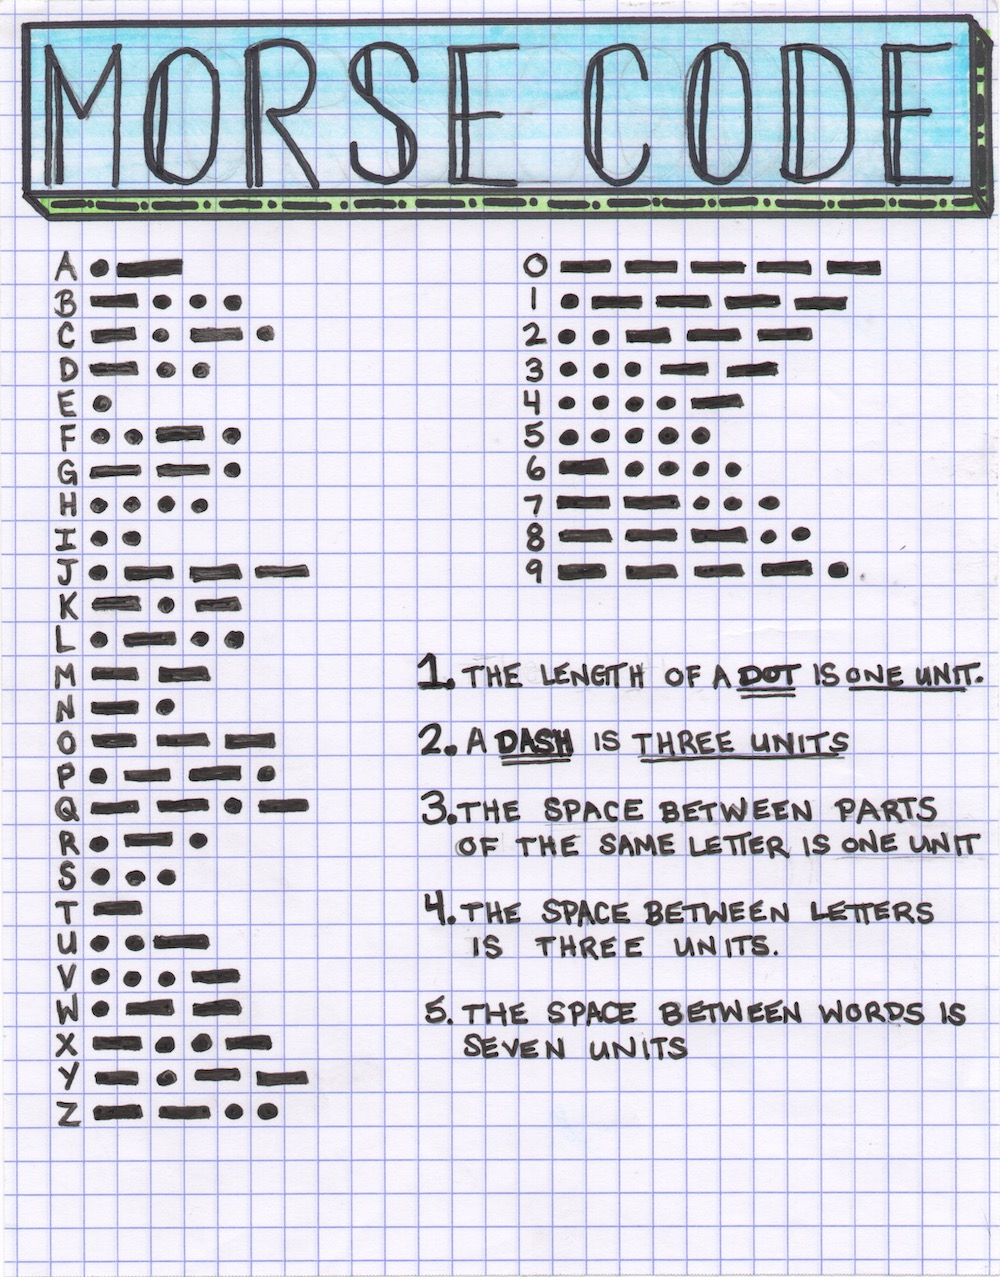
Fig. 3. Use this Morse Code Guide to help understand each letter.
Image copyright and source
Image by Emily Sesno
Part B: Communicate Across Distances
Two types of string (e.g. fishing line, embroidery string, twine, yarn, hemp etc.)
2x cups to use as listening devices (e.g. 2 tin cans, 2 paper cups, or 2 plastic jars)
2x paperclips
Drill or other sharp object (to poke holes in the listening devices - Adult supervision required!)
Optional: Hot glue or tape
Teacher Recommendations:
You can print and laminate the Morse Code Alphabet Guide (attached above) to reuse.
Check out this Morse Code Translator! You can use this as a tool in your classroom to experiment with more detailed messages. The translator uses both light and sound, and you can adjust the speed so it is easier to hear.
Notes on materials:
If the edge of the cans are sharp, use the optional hot glue or tape to smooth or cover them where students may put their mouths to speak.
Different thicknesses of string may send signals of variable strength. The procedures are written so that each group uses two types of string and compares their effectiveness.
To conserve supplies, you can also assign different types of string to each group and have students rotate to experience the differences.
You can also have students engineer telephones using different types of listening devices. Each group can use different types of cups to create multiple designs, or you can have groups trade completed designs.
Procedure:
Part A: Learn Morse Code!
Follow along on your worksheet to conduct your trials and answer the questions.
Before you begin, think about the ways you communicate with your friends who live far away:
What are three different methods of communication that you use?
How do these methods differ?
Are you able to communicate the same ideas or feelings in each method?
How did your grandparents, or great-grandparents, communicate before cell phones?
What about before computers? before dial-up phones? before mail service? before written language?
Read the background information on your sheet to familiarize yourself with the guidelines for morse code.
Background Information:
Image
Image caption
Fig. 4. All letters in Morse Code are made up of dots (or dits), and dashes (or dahs).
Morse code is a system of communication that uses dots and dashes to relay messages. A dot looks like a period, and a dash is a long horizontal line. A dot is called a dit, and a dash is called a dah (Fig. 4).
Different combinations of dits and days represent each letter in the english language. They can be strung together to create words and sentences.
Timing
The length of each symbol is related to the length of one dit:
A dit is one unit of sound.
When switching between dits and/or dahs in the same letter, you leave one unit of silence.
A dah is the length of three units (three dits).
To move to the next letter, you insert a pause of three units. To move to the next word, you insert a pause of seven units.
Remember:
Dit (.) = 1 unit
Dah (—) = 3 units
Between dits and dahs within a letter = 1 unit of silence
Between letters in a word = 3 units of silence
Between two words = 7 units of silence
Now that youʻre familiar with how Morse Code works, practice by making the sounds for the short "dit" (.) of 1 unit , and the longer, drawn out "dah" (—) of 3 units. Note: You can tap your finger while you say each letter to help keep pace, or use a metronome. Sometimes a dit is just pronounced as "di."
Image
Image caption
Fig. 5. Remember 'mail - man' for the code for the letter 'm' (dah-dah).
Take a look at both of your alphabet guides. One shows you the dits and dahs for each letter. The other uses the shape of the letter to help you remember. Additionally, memory devices, or word associations, can help you recall certain letters. For example, the word "mailman" starts with the letter "M." So, sounding out "mail - man" might help you remember that letter as "dah dah." If itʻs helpful, come up with creative ways to match the sounds from each letter.
Image
Image caption
Fig. 6. Saying the work "al faa" can help you remember the di-dah of the letter 'a.'
Image copyright and source
Image by Emily Sesno
Letʻs start out with the letter "A." This letter is simple, with just a dit and a dah. A helpful word association might be the word "alpha" or "al - faa." Say it out loud, then write it out on your worksheet.
Continue in this way to spell out the word "ALOHA" on your worksheet.
Now that youʻve practiced writing and sounding out "ALOHA," conduct your trials:
Image
Image caption
Fig. 4. Can you decipher this riddle?
Image copyright and source
Image by Emily Sesno
Trial #1: Decipher the Code
Work with a parner to decipher the Morse code on your worksheet to reveal a secret message. Note: Each red line corresponds to a combination of dits and dahs that makes up a letter. Write your answer on the red lines.
Can you guess the answer to the riddle? Continue to trial #2 to find out!
Trial #2: Speaking in Morse Code
Read the morse code script below to your partner. Remember the timing:
Dit (.) = 1 unit
Dah (—) = 3 unit
Space between dits and dahs within a letter: 1 unit of silence
The space between letters: 3 unit of silence
The space between words: 7 unit of silence
"di-di-di-dit di-dah di-di-di-dah di / di-dah / di-di-di di-dah-dah dit di-dah-di-di di-dah-di-di / dah di-dit dah-dah dit."
As your partner listens, have them write the dots and dashes on their worksheet, then work together to translate the message.
Trial #3: Morse Code in Lights
Now that you're experienced with writing and listening, test your visual interpretation skills with lights!
The pattern of turning lights on and off can work in the same way as dits and dahs.
Practice by expressing the letter "a" in light by turning your flashlight on for 1 unit, off for 1 unit, on for 3 units, then off (dit-dah). Note: Aim the light on the floor, on a peice of dark paper, or at the wall. Don't shine it in anyones eyes!
Now, write out your name on your worksheet in dits and dahs. Your name in Morse Code: _________________________________.
Use your flashlight to spell out your Morse Code name with light. Show your partner!
Answer the questions on your worksheet:
Which method of communication did you find easiest?
Which method of communication did you find hardest?
What is an advantage of Morse Code?
What is a disadvantage of Morse Code?
Part B: Make your own telephone!
Adult supervision required!: Poke or drill small holes in the bottom center of both listening devices.
Cut a piece of string about 15-20 feet. Note: make sure you have enough space to stand with the full length of the string pulled tight.
Thread one end of the string through the bottom of the listening device, from the outside in.
Pull the string through the hole and tie the end of the string to a paperclip to hold it in place it so the string canʻt pass back through the hole. Note: you can also tie a knot if you do not have a paper clip.
Repeat steps 3-5 with the other end of the string and listening device.
Hold one listening device and have your partner hold the other. Walk away from each other until the string is fully stretched and tight between the listening devices.
Hold the listening device up to your ear and have your partner speak into their listening device.
Talk back and forth with your partner!
Change out your string with the other type of string in your materials. Retest your phone by talking with your partner, and record your observations.
Further Investigations:
Do your own research to find more examples of patterns used to transfer information. Click below to get ideas on additional examples to investigate:
1.Look at your Morse Code Guide for numbers 0-9. What do you notice about the patterns?
Use the guide to write your birthday in Morse Code:
month number (with 1 for January through 12 for December):
day:
year:
Describe three different methods you used to communicate in this activity.
Describe two different ways that animals use patterns to communicate (Hint: think about coloration, body motion, and sound.)
Which string material worked the best for your telephone design? Why might one type of string might work better than another?
What material were your listening device cups made out of? Do you think that another type of material might have worked better? Why?
Describe a design change that you think would make your telephone better.
How was your experience making the telephone similar and different to an engineer developing a new type of phone?
Related Conversations
Exploring Our Fluid Earth, a product of the Curriculum Research & Development Group (CRDG), College of Education. � University of Hawai?i, 2011. This document may be freely reproduced and distributed for non-profit educational purposes.


")


")


